Tracking and measuring project progress
Gantt charts
One of the most popular tracking methods and can be used for all types of projects. Gantt charts typically live in your project plan and are updated as the project progresses.
Gantt charts are useful for:
- Helping a team stay on schedule
- Projects with lots of tasks, dependencies, and milestones
- Projects with large teams, because ownership and responsibilities are explicitly laid out visually
Some tools:
Roadmaps
Roadmaps also track both individual and project progress toward milestones. However, Roadmaps are best suited for tracking big milestones in your project.
Roadmaps are useful for:
- High-level tracking of large milestones. Roadmaps outline the project as a whole and provide an overall snapshot of key points—just like an actual roadmap contains points of interest and mile markers.
- Illustrating to your team or key stakeholders how a project should evolve over time
Tools and templaes:
Burndown charts
Typically used by Agile Scrum teams and reveal how quickly your team is working by displaying how much work is left and how much time remains to complete the work.
Keep the project team on top of targeted completion dates and make them aware of scope creep if it occurs. The chart should be displayed so everyone can see it and needs to be updated regularly in order to be effective.
Useful for:
- Projects that require a detailed review of tasks
- Projects where finishing on time is the top priority
Tools and templates:
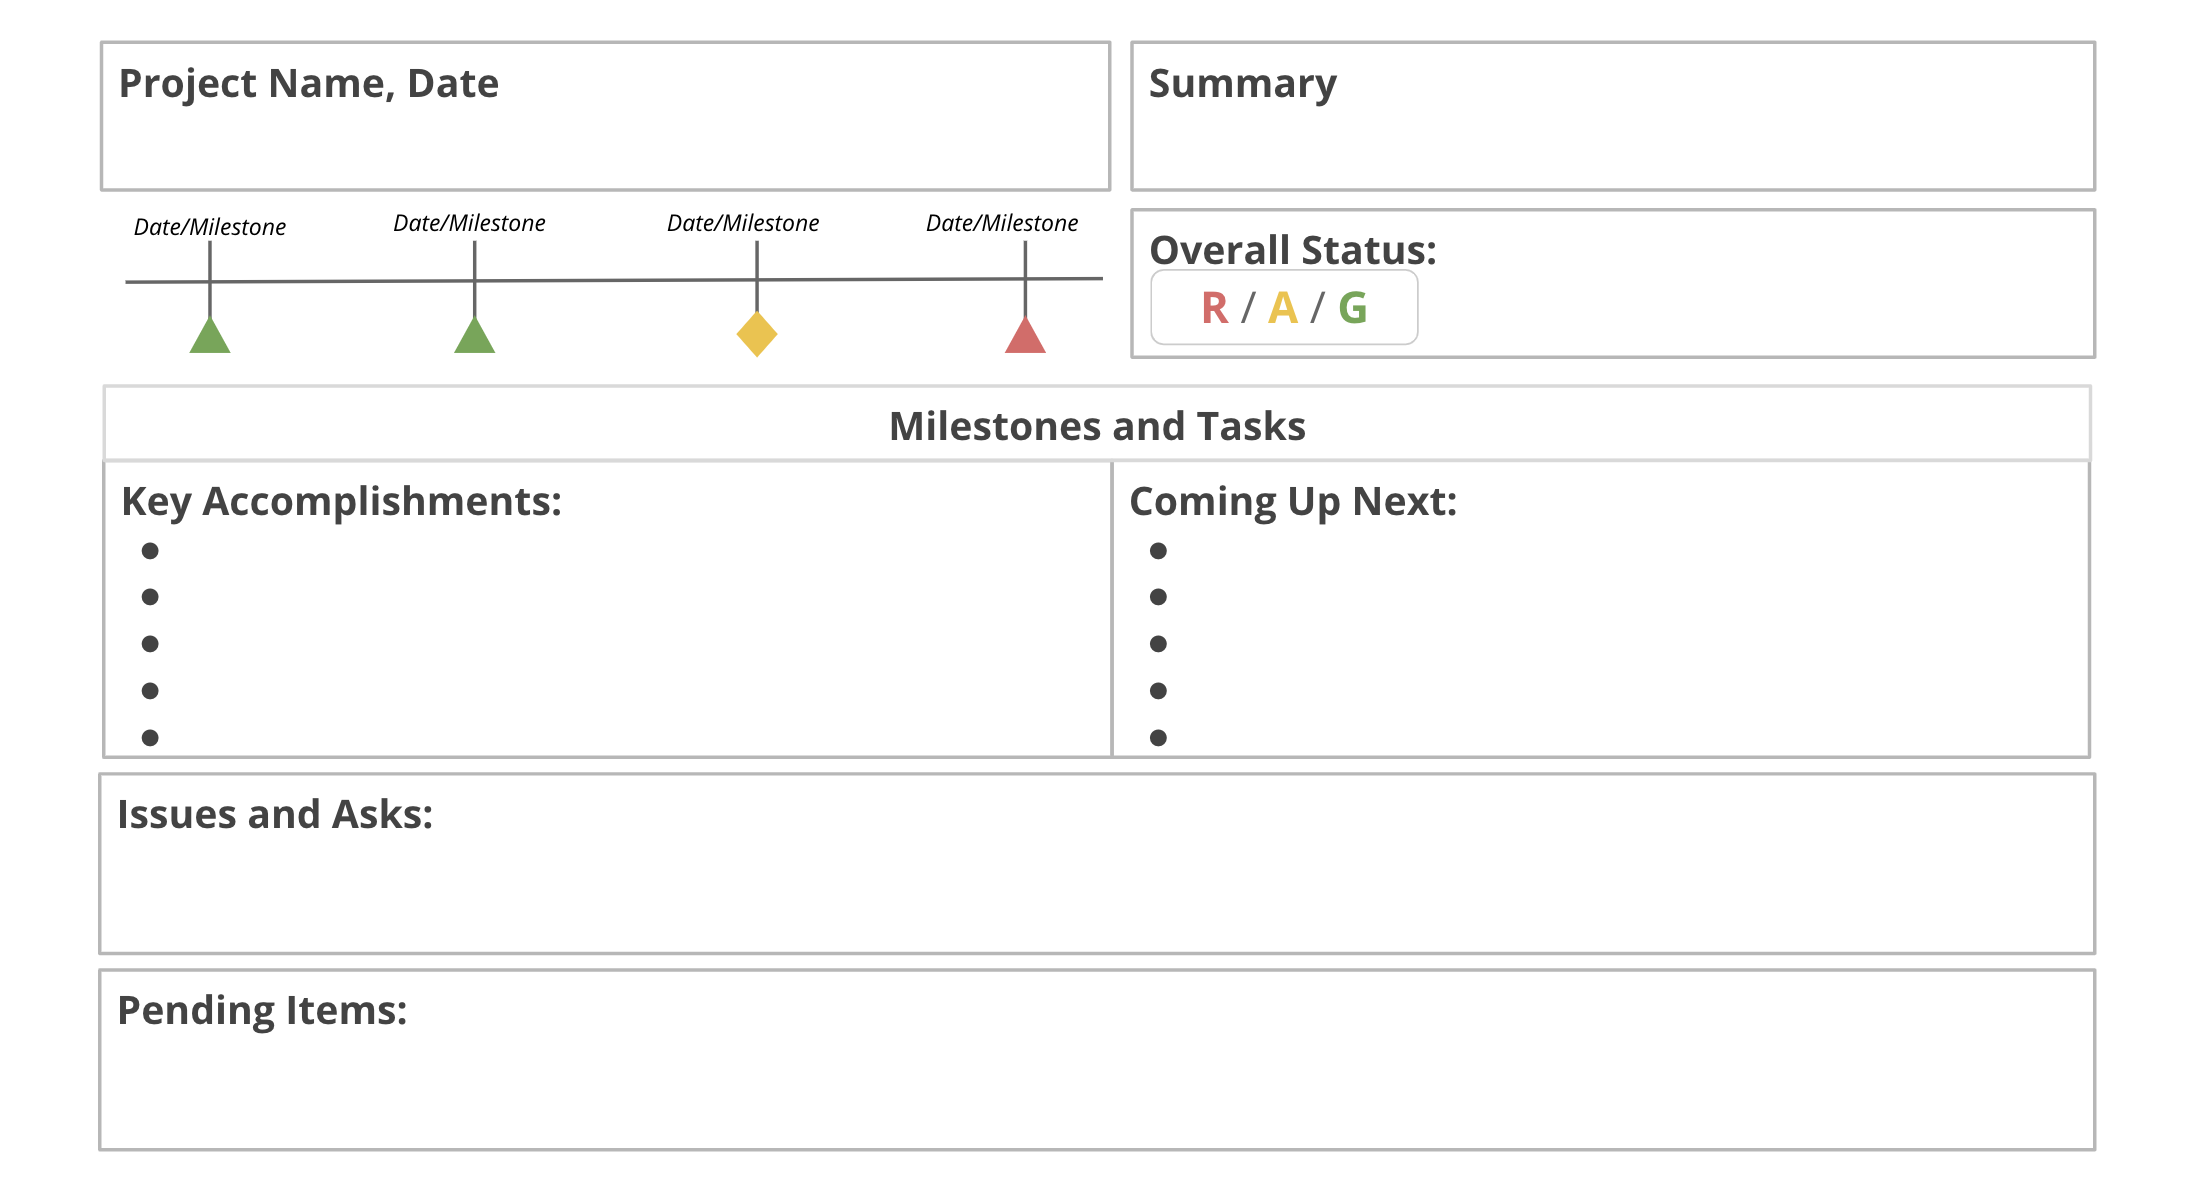
Project status reports
Track and communicate common project elements in a snapshot.
Key components:
-
Project name: Should be specific to the purpose of the project so that the overall goal of the project can be understood at-a-glance.
-
Date: Project status reports will be created many times during the course of a project's implementation phase. Reports can be created weekly or monthly—it all depends on the stakeholders' needs and pace of the project. Adding the date to each status report acts as a reference point for your audience and also creates a history log of the project's status over time.
-
Summary: The summary condenses the project's goals, schedule, highlights, and lowlights in one central place for easy stakeholder visibility. Usually, the summary section will be followed by, or grouped with, the timeline summary and the overall project status.
-
Status: Status is a crucial piece. The status of the project illustrates the actual progress versus the planned progress. A common way to depict this is through RAG (red, amber, green), or Red-Yellow-Green, status reporting. RAG follows a traffic light pattern to indicate progress and status. Red indicates that there are issues that need resolution and that the project may be delayed or go significantly over budget. Amber/Yellow means that there are potential issues with schedule or budget, but that the issues can likely be resolved with corrective actions. And green means the schedule and budget are doing fine and that the project is on track. You can use RAG to indicate the overall project status, as well as milestone status. Every project team and stakeholder may have a slightly different perspective on what the colors mean and how urgent it is to escalate issues when they see an amber/yellow or red status, so it's important to make sure everyone understands what the different color statuses mean for your project.
-
Milestones and tasks: A summary of the project's major milestones thus far and current tasks helps the team and stakeholders easily visualize the progress of those elements. In a project plan, you will typically depict the tasks and milestones as ‘not started,' ‘in progress' or ‘completed' at an item-by-item level. But, in the project status report, it is common to summarize these items into two categories to better communicate the status. You'll use key accomplishments to detail what has happened, and upcoming to detail what big milestones you will accomplish next.
-
Issues: The issues include your project's current roadblocks and potential risks. Status reports are an important opportunity to set expectations with your stakeholders. If your project status is red or amber, you can flag what is preventing you from being where you planned to be. You can also use this opportunity to state your plan to get the project back to green, and ask for any resources or help you may need to do so. You will learn more about communicating big risks and issues in the upcoming videos.
Types You can format your report in a variety of ways depending on your audience and what you need to communicate.
- If you need to share a status report with your team for a project that contains multiple layers of complexity, it may be best to format the report in a spreadsheet in order to keep track of all the moving parts.
- If you simply need to communicate updates to senior stakeholders, your status report may be best formatted as a slideshow, like the one below, containing only an overview of the most key points.
Managing changes, risk and dependencies
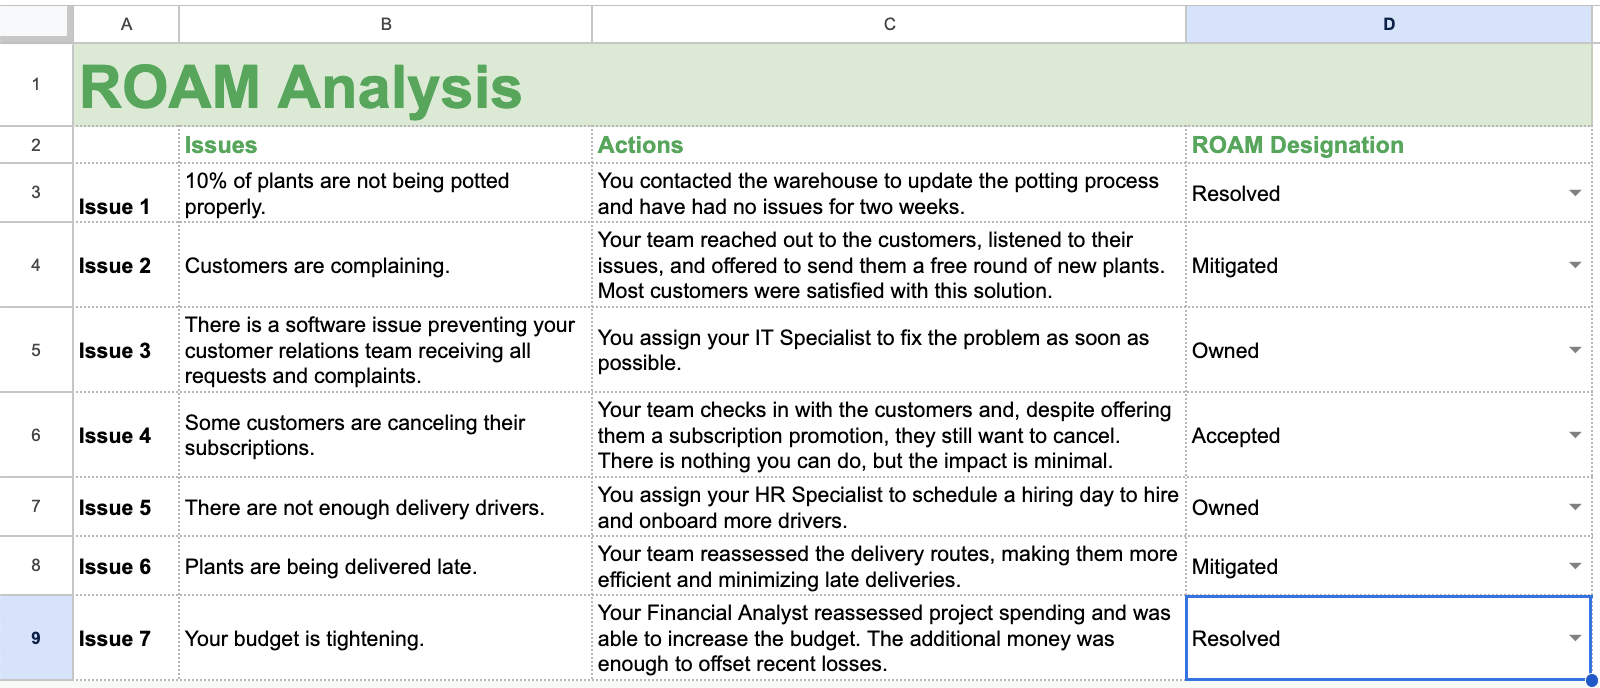
ROAM
Analyze, prioritize, and manage risks that have already become issues. It's a great tool to keep teams organized, so they know what needs to be done to keep the project moving forward.
Identify project issues and put them into one of the following four categories:
- Resolved: The issue has been eliminated and no longer poses a problem.
- Owned: The issue has been assigned to a team member who will monitor it through to completion.
- Accepted: The issue is minor or cannot be resolved, so the team chooses to accept and work around it.
- Mitigated: The team has taken action to reduce the impact of the issue (or reduce the likelihood of a risk that has not yet materialized).
Communicating issues to stakeholders
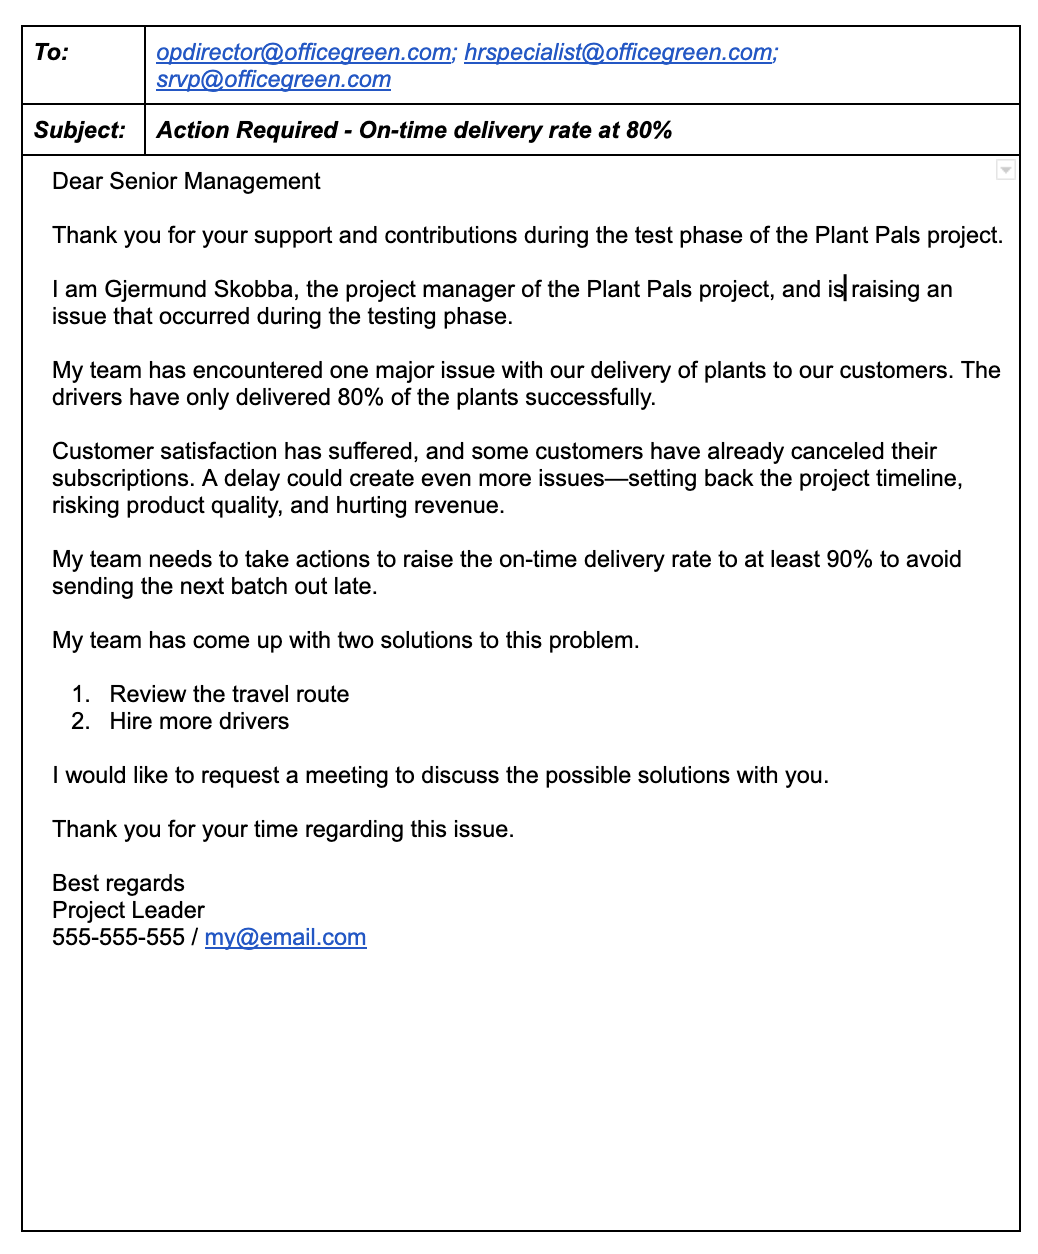
Effective escalation emails
Maintain a friendly tone
When drafting an escalation email, you may feel tempted to get straight to the point, especially when dealing with a stressful and time-sensitive problem. But keep in mind that it is important to address issues with grace. Consider opening your email with a simple show of goodwill, such as "I hope you're doing well." When describing the issue, aim for a blameless tone. Above all, keep the email friendly and professional. After all, you are asking for the recipient's help. Be sure to close your email by thanking the recipient for their time.
State your connection to the project
Introduce yourself early in the email if you have less familiarity with the project stakeholders. Be sure to clearly state your name, role, and relationship to the project. This helps the reader understand why you are reaching out. Keep your introduction brief and to the point—a single sentence should suffice. If you know the person on the receiving end of the escalation email, you can simply reinforce your responsibility on the project before getting straight to the problem.
Explain the problem
Once you greet your recipient and briefly introduce yourself, explain the issue at hand. Clearly state the problem you need to solve. Provide enough context for the reader to understand the issue, but aim to keep your message as concise as possible. Avoid long, dense paragraphs that may obscure your message and tempt the reader to skim.
Explain the consequences
After explaining the problem, clearly outline the consequences. Describe specifically how this issue is negatively impacting the project or how it has the potential to negatively impact the project later in the project timeline. Again, keep your explanation concise and your tone friendly.
Propose a course of action and make a request
This is the central piece of a strong escalation email. In this section, you propose a solution (or solutions) and state what you need from the recipient. A thoughtful solution accompanied by a clear request lets the recipient know how they can help and moves you toward a resolution.
Escalation Email